Showing posts with label fruit. Show all posts

Thursday, October 7, 2010

Crockpot Apple Butter

Last week we went up to Loveland to have dinner with my family. As we were pulling into my sister’s driveway, I couldn’t help but notice the huge apple tree in her backyard. I was so excited when she handed us a bag and told us to take what we wanted.

Picture 208It helps having a tall guy around. Picture 209My niece, McKenna, holding up the perfect apple!

 Our BountyPicture 210

I really wish we had weighed the bag of apples or at least counted them. Sadly, we did not. Instead, my focus was on how I was going to use all of them before they started rotting. The apples were only about 2-1/2 inches in diameter, some with bad spots, so my first thought was Apple Butter.

I grew up eating Apple Butter on french toast. In fact, I remember having french toast at a friend’s slumber party when I was younger. I found it strange that my friends were pouring maple syrup over their french toast instead of Apple Butter. Needless to say, I was the strange one (nothing new…ha ha!). Anyway, to this day, when I make french toast I like to spread a good layer of Apple Butter on top. Usually I just use the stuff from the store, but I now have several containers in the freezer thanks to my extra large basket of hand-picked apples. Here’s how I turned my bounty in to Apple Butter.

 The line-up of ingredients . . .IMG_1894Apples (approximately 6 quarts or enough to fill a large Crockpot), 1/4 teaspoon of cinnamon, 1/4 teaspoon ground cloves, 1/4 teaspoon of salt, and 4 cups of sugar or less.

I would recommend that you use a variety of different apples. The first time I made apple butter  I used only golden delicious. Another time I combined macintosh, gala, and granny smith. I believe the apples from the tree are close to a gala apple since they were on the sweeter side. We ended up using about 5 quarts of the apples from the tree. I then added a couple of gala and honey crisp apples that I had on hand. Use your own judgment about the types of apples you use and how many of each kind you use. How much sugar you use will depend on the sweetness of the apples.

PreppingIMG_1895  Peel, core, and finely chop the apples.

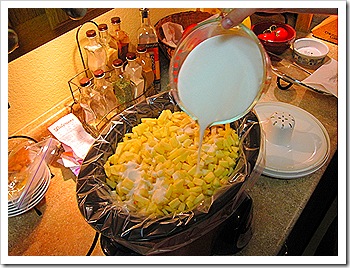
IMG_1901Fill the Crockpot heaping full of apples (the lid may not fit but apples will shrink as they cook) and drizzle sugar over the top.

Begin with less sugar, especially if you are using sweet apples. I started with 2-1/2 cups of sugar.

IMG_1903Add cinnamon, cloves, and salt.

 IMG_1904Stir together, place lid on top, turn the Crockpot on low, and go to bed.

Okay, the last step is completely optional. Because it takes several hours for the apple butter to cook, it made sense to me to let it cook overnight while I got my beauty sleep. My house smelled wonderful the next morning. The beauty thing . . .well, we won’t talk about that!

I put this batch in the Crockpot around 11 pm and about 14-1/2 hours later it was ready to go in the freezer.

The transformation . . .IMG_1905After 7 hours of cooking.

IMG_1906One minute later after stirring the apples. Notice the shrinkage!

IMG_1908 After 9-1/2 hours of cooking.

IMG_1910After 11-1/2 hours of cooking. I used my potato masher to begin breaking down apples even further. I also added another half cup of sugar.  

 IMG_1912Ready to go after 13 hours of cooking.

 IMG_1914I let it cool for an hour before placing in the freezer containers.

This is my first time using the freezer containers (8 oz containers made by Ball). In the past I’ve actually used different size jars and canned the apple butter. Either way works great. Personally, I wanted to save a little time and since I have a deep freezer this was the way to go.

All divvied up and ready to freezeIMG_1917 I serious wish I’d had a biscuit to slather this stuff on. I settled for licking it directly off the spoon.

 Made with love . . .IMG_1930Since I plan on sharing this batch with others, I went ahead and made some labels (okay, it was a great excuse to use my Xyron Creative Station). And, how sweet that we made this on our 2-year wedding anniversary. Everybody say it. . . .Ahhhh!!

And, there you have it . . . Homemade Apple Butter. Easy peasy in the freezy! Yep, it’s been a long day and I am slap happy. I hope you enjoy!

Crockpot Apple Butter               Printable Recipe
Ingredients:    
   Apples (approximately 6 quarts or enough to fill the Crockpot)
   4 cups of sugar or less   
   1/4 teaspoon of cinnamon
   1/4 teaspoon ground cloves
   1/4 teaspoon of salt.

Directions:

1. Peel, core, and finely chop the apples.
2. Fill the Crockpot heaping full of apples (the lid may not fit but apples will shrink as they cook).
3. Drizzle sugar over the top (sweet apples require less).
4. Add cinnamon, cloves, and salt.
5. Stir together, place lid on top, and turn the Crockpot on low.
6. Cook until thick and dark in color.
7. Place in small jars or freezer containers. Leave enough room for expansion.
8. Cool and freeze.

Notes:
Use your own judgment about the types of apples you use and how many of each kind you use. How much sugar you use will depend on the sweetness of the apples.

Begin with less sugar, especially if you are using sweet apples. Taste the mixture mid-way through cooking to determine whether or not you need more sugar.

If desired, use a potato masher  near the end of cook time to further break down the apples.

If you are using jars, make sure you follow the directions for canning and storing.


Friday, September 3, 2010

Strawberry Rhubarb Pie

If I had to choose a favorite kind of pie, I would probably make my choice according to season. In the Fall/Winter, especially at Thanksgiving, pecan pie is my top choice. In the Spring/Summer, I salivate for strawberry rhubarb pie. Mmmmmmmm! There is nothing like a good slice of warm strawberry rhubarb pie with a big scoop of vanilla ice cream. The combination of tangy and sweet is just perfect. 

Growing up, I enjoyed strawberry rhubarb pie made by the hands of my grandmother and mother. It has always been a treat to have someone else make something I love. And, quite honestly, I was just afraid to try making it myself. Well, when a co-worker told me she had some rhubarb to get rid of, I thought it was the perfect opportunity to make this pie for myself.

I already knew the basic ingredients for the pie but was unable to locate my recipe. Thus, I used an online recipe as a guide and made my own adjustments. It turned out perfect! My husband, who hates this particular type of pie, told me it was good (after more than one bite). I took it to work, and my co-workers enjoyed it too. My boss told me she thought it was good enough to enter in a contest. Whoa! And, she asked if the crust was homemade. Well, from the pictures below you’ll see that I didn’t go that far, but I was pretty proud of my first Strawberry Rhubarb Pie.


The Ingredients: 
IMG_1349  
Pillsbury pie crusts*, Strawberries, Rhubarb.
Also needed: Sugar, Tapioca, Salt
Optional: Grated orange peel (I did not use this)

*One box of Pillsbury pie crusts (two crusts) will suffice for one pie.

Mixing sweet  and sour . . .IMG_13551 cup of stemmed and sliced strawberries (I used about 1-1/4 cups)

I decided to hull my strawberries just because it’s fun. See my tip below for a quick (easy and cheap) way to hull a strawberry

IMG_1354
3 cups of rhubarb stalks cut into 1/2 inch pieces

IMG_1358
Combine strawberries and rhubarb. Add 1 cup of sugar,
3 Tablespoons of Tapioca, and 1/4 teaspoon of salt.
Optional: Add 1 teaspoon of grated orange peel (I did not add this)

IMG_1359
Let mixture set for 10 minutes.

I actually let this sit (in fridge) for 1-1/2 hours because I had something else in the oven and wasn’t ready to bake it. I think letting it sit longer actually help sweetened it.

Putting it all together . . .  IMG_1361
Add mixture to a pastry-lined 9” pie dish.

 IMG_1362
Top with the pastry, trim the edge, and crimp the top and bottom edges together. Cut slits in the top for the steam to escape. I also brushed the crust with an egg wash (water mixed with egg)
Optional: Add a heart!

My “crimping” is awful, but I promise that it does not affect the taste.

Into the oven . . . IMG_1363Bake at 400 degrees for 20 minutes. Reduce heat to 350 degrees and bake an additional 30-40 minutes longer. I didn’t want my crust to brown too much so I used a pie protector (seen above). 

The finished product . . .IMG_1367Maybe I should call it “Bleeding Hearts” pie.

IMG_1368The longer this pie cools, the more it will thicken up. I could hardly wait to try a bite so I only let it cool for about 10 minutes.

DELICIOUS!!!IMG_1369

I was so happy how this pie turned out. I’ve always used ice cream to sweeten the “tang” of strawberry rhubarb pie. And, I typically only like pie when it’s warmed up. I didn’t need any ice cream with this pie, and I thought it was good straight from the fridge. Mmmm…yummy!

Oh, by the way . . . my tip for hulling a strawberry  . . .

As easy as  . . .

                       1 
IMG_1350
                    2 IMG_1352
                                                 3IMG_1353                      All it takes is a sturdy drinking straw!

Strawberry Rhubarb Pie
Ingredients:  
  1 cup strawberries, stemmed and sliced (hulling is optional)
  3 cups rhubarb stalks, cut into 1/2 inch pieces
  1 cup sugar 
  3 Tablespoons of quick cooking tapioca (eg, Minute Tapioca)
  1/4 teaspoon of salt
  Unbaked pastry for two-crust 9 inch pie (Ieg, Pillsbury pie crusts)
  Optional: 1 teaspoon of grated orange peel

Directions:
1. Preheat oven to 400 degrees
2. Mix the rhubarb and the strawberries with the sugar, tapioca, and salt (if desired, add orange peel). Let the mixture sit for 10 minutes
or longer.
3. Add mixture to a pastry-lined pie dish. 
4. Top with the second pastry, trim the edge, and crimp the top and bottom edges together. Cut slits in the top for the steam to escape. If desired, brush the top of the crust with an egg wash (water mixed with egg).
5. Bake at 400 degrees for 20 minutes. Reduce heat to 350 degrees and bake an additional 30-40 minutes longer.
6. Cool on rack.

Notes:
According to the site I use to adapt this recipe, if you are making a 10 inch pie, or just want more filling, use 4.5 cups of rhubarb, 1.5 cups strawberries, and 1 1/4 cup of sugar. I made a 9 inch pie but did add more sugar and strawberries.

To keep crust from browning, use a metal pie protector or place foil around the edges. If the crusts needs to brown slightly, remove  the pie protector/foil for the last five minutes of cooking time.

I hope you enjoy this pie as much I did!
BlogSignaturesmallercopy-1