Showing posts with label family favorite. Show all posts

Monday, October 18, 2010

Jiffy Burgers and Potato Wedges with Ranch

In my first recipe post I shared the recipe for a delicacy from my childhood—Cheese and Taco Frenchies. I had to come up with my own version since the restaurant that served them—Peter’s Dairy Creme—closed in 1994.

Well, Peter’s had another delicacy called the Jiffy Burger. Basically, a Jiffy Burger is seasoned meat with a special mustard/mayo/ pickle/onion type of sauce on top. I personally think the sauce tastes like mustard potato salad without the potatoes.

When Peter’s closed they sold the Jiffy Burger recipe to Sehnert’s Bakery & Bieroc cafe (local bakery) so it still is possible to get a Jiffy Burger in my hometown McCook. The local grocery story also used to sale the jiffy sauce, but I’m not sure whether or not they still do. Disclaimer:  It is possible that the Jiffy Burger name is trademarked. If it is, I hope someone will let me know. I am not trying to claim the name or the product. I just had a craving and therefore came up with my own version. :-)

Unfortunately, I don’t get back to McCook very often and was very happy when my mom came up with her own version of the jiffy sauce and passed it on to me. I made a few of my own changes and now am able to re-create my own version of my favorite Peter’s meal. . . Jiffy Burgers and Potato Wedges with Ranch.

Jiffy SauceIMG_1946Ingredients: Yellow mustard, real mayonnaise (no substitutes), dill pickles, and white onion

IMG_1958 Mix 1 cup of mayonnaise, 1/4 cup of yellow mustard, 1/4 cup of finely chopped dill pickle, and a little more than 1/4 cup chopped onion.

IMG_1962The sauce should be light yellow in color. After mixing, place in the refrigerator to chill. The longer it chills, the more the flavors mix together.

Jiffy Burger MeatIMG_1949Ingredients: Ground beef, white onion, Worcestershire sauce, and Cream of Wheat

I do not recommend using lean ground beef for the jiffy burger meat mixture. For it to taste right, you actually want that extra fat. I used 80/20 ground beef and it was the perfect mixture.

IMG_1966Brown the ground beef with 1/4 cup of the finely chopped/minced white onion.

I actually add some dry minced onion along with the fresh onion because the flavor is more concentrated, and I like how it seeps into the ground beef. 
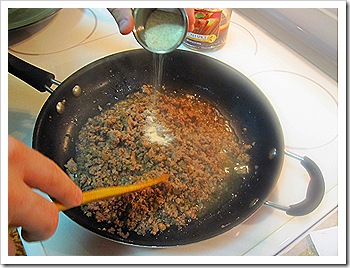
IMG_1968Do not drain grease. Add a splash of  Worcestershire sauce and some Cream of Wheat to the ground beef.

The amount of Worcestershire sauce and Cream of Wheat you add will depend on how many pounds of ground beef you are using. I used 1 pound of ground beef and added approximately 1 teaspoon of Worcestershire sauce and 2 tablespoons of Cream of Wheat. I also added a little bit of water (approximately 1/2 cup) to further break down the meat.
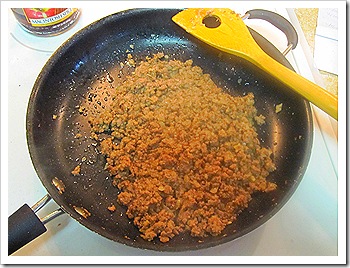
 IMG_1971Make sure you taste the meat mixture and salt to taste. It should have a nice onion-seasoned flavor. The beef itself should be broken down and the Cream of Wheat and water will make it stick together (similar to the consistency of a sloppy joe).

Potato Wedges with Ranch IMG_1951Ingredients: Potatoes and 1 packet of Hidden Valley Ranch dressing mix (plus 1 cup of milk and 1 cup of mayonnaise).
Mix the dressing and place in refrigerator to chill.

The Ranch dip that Peter’s served with their wedges was so tasty. I like that it was runny rather than thick. Hidden Valley Ranch “Dressing” is very close to what they served. Who knows!? Maybe that is what they used.

Honestly, my desire for the “right” dressing drives my family crazy. While at my parents house this summer, my mom grabbed the bottled of Ranch out of the fridge. I said, “no way, it’s not the same.” If we would have been in Denver, I would have just dealt with it. But, since the grocery store was less than 5 minutes away, I mixed up the mayo and milk and had it ready for my hubby to get home with the seasoning packet. Hard-headed? Yes! But, no one could argue with me that it didn’t taste good. ;-)

IMG_1964Cut potatoes into wedges and place on a cookie sheet that has been sprayed with PAM (or other nonstick cooking spray). Spray the tops of the wedges and sprinkle lightly with seasoning salt (eg, Lawry’s). Bake at 375* for approximately 20-25 minutes or until soft on the inside and crispy on the outside.

I like to make sure the potato wedges are completely coated. If you don’t have cooking spray, use vegetable oil and just coat the pan and wedges really well. Make sure you turn the wedges at least once during cooking. For crispier wedges, turn the broiler on low during the last 5 minutes. Just make sure you keep an eye on them unless you want ‘em really crispy. If desired, you can fry your wedges in a deep fryer. I like to think of this as the “somewhat” healthier alternative. Ha!

  Assembling the Jiffy Burger . . . IMG_1973Place about 2 tablespoons of the meat mixture onto the bottom half of a hamburger bun. Add a spoonful of the Jiffy sauce on top of the meat mixture.

Comfort food at it’s finest . . .IMG_1978

I know there are a few  of my classmates and other “McCookites” longing for a Jiffy Burger. Let me know if you try this out and what you think. Enjoy!!!

Jiffy Burgers                                                   Printable Recipe
Ingredients:    
   1/4 cup of yellow mustard
   1 cup of real mayonnaise (no substitutes)
   1/4 cup of finely chopped dill pickle
   1 White onion (1/4 cup chopped for sauce and 1/4 cup finely       
      chopped/minced for meat)
   Ground beef 
   Worcestershire sauce
   Cream of Wheat
   Salt (to taste)
   Hamburger buns

Jiffy Sauce Directions:

1. Mix yellow mustard, mayonnaise, dill pickle, and onion. The mixture should be light yellow in color.
2. Set in refrigerator to chill.

Jiffy Burger Meat Directions:
1. Brown the ground beef with onion. Do not drain the grease.
2. Add a splash of  Worcestershire sauce and some Cream of Wheat.
3. Add some water (approximately 1/2 cup) to break down the meat a bit further. The beef itself should break down and the Cream of Wheat and water should make it stick together (similar to the consistency of a sloppy joe).

To Serve:

Place about 2 tablespoons of the meat mixture onto the bottom half of a hamburger bun. Add a spoonful of the Jiffy sauce on top of the meat mixture.

Notes: 
Use ground beef with a little extra fat, such as 80/20. You do not want to use lean ground beef.

For added flavor, add some dry minced onion. You can use it alongside the fresh onion or in place of it.

The amount of Worcestershire sauce and Cream of Wheat you add will depend on how many pounds of ground beef you are using. For example, if using 1 pound of ground beef you will add approximately 1 teaspoon of Worcestershire sauce and 2 tablespoons of Cream of Wheat.


Potato Wedges with Ranch                            Printable Recipe

Ingredients:
   Potatoes 
   Nonstick cooking spray (eg, Pam) or vegetable oil
   1 packet of Hidden Valley Ranch dressing mix 
   1 cup of milk 
   1 cup of mayonnaise
Directions:
1. Mix the dressing ingredients and place in refrigerator to chill.
2. Cut potatoes into wedges and place on cookie sheet that has been sprayed with PAM (or other nonstick cooking spray).
3. Spray the tops of the wedges and sprinkle lightly with seasoning salt (eg, Lawry’s).
4. Bake at 375* for approximately 20-25 minutes or until soft on the inside but crispy on the outside.

Notes:
For crispier wedges, turn the broiler on low during the last 5 minutes. Just make sure you keep an eye on them unless you want ‘em really crispy

BlogSignaturesmallercopy-1

Monday, September 27, 2010

My “cook and go clean” Chili

I love this time of year. The leaves are changing, the weather is cooler, and I can finally make chili without hearing my husband groan. It’s not that he doesn’t like chili, he’s just not a big fan of soup in general. Personally I love making big batches of different kinds of soup so I can freeze and have later in the Winter.
 
For some reason, my family loves my chili. It receives rave reviews every time I’ve made it. And, I honestly can’t say why. All I do is dump a lot of stuff in and season it to taste. It’s not spicy and it’s not blah. It’s just right. hmmmm…perhaps my wooden spoon is a magic wand!? Ha ha! Yeah right. Regardless, it has become a family favorite. In fact, my hubby actually gave high reviews for the batch you are about to see. Score!
 
Along with Fall cooking comes Fall decorating and, of course, Fall cleaning. Oh Joy! Since I like to get the most out of my day and don’t have time to slave away in the kitchen, this is my “Cook and go Clean” Chili . . .
Lining up the ingredients . . .IMG_1745Ground beef, white onion, ketchup, chili beans, kidney beans, tomatoes, green chiles, tomato sauce, chili powder.
 
I wanted a big batch of Chili so I used 2 lbs of ground beef, 1-1/2 cans of green chiles, and large cans of chili beans and tomatoes. You can certainly half the recipe if desired.
 
You can substitute ground turkey for the ground beef (or do half and half). It tastes just as good but you may need to work harder to get it seasoned properly.
 
It’s all in the seasoning . . . IMG_1746In a large pot, brown the ground beef. I sprinkle it liberally with chili powder because I think this is what sets the flavor.
 
IMG_1748
While the ground beef is browning, add chopped onion (to taste) and one can of green chiles. Continue browning and then drain grease.
 
Adding the good stuff . . . IMG_1752 
Add tomatoes. You can use any type of tomatoes (diced, crushed, whole, etc.) For this batch I used whole tomatoes and cut them up with the wooden spoon.
 
In the past I’ve used the “tomatoes with green chiles” and “tomatoes in chili seasoning.” Both have very good flavor. Since I didn’t have any of these on hand, I just made sure I used a good deal of chili powder.
 
IMG_1753
Add kidney beans (drained and rinsed) and chili beans.
 
IMG_1758
For a little bit of sweetness, I add about a tablespoon of  ketchup. I also add approximately 3/4 of a large can of tomato sauce and another good sprinkling of chili powder. Add salt and pepper as needed!
 
If I do not have enough liquid from the tomatoes, chili beans, and tomato sauce, I will add  liquid by mixing water with the juices from the cans. Obviously, if you want a chunkier soup, you may not even bother with this.
 
Adding more liquid . . .
Add enough water to catch the “stuck-on” juices. I do this with both cans (chili beans and tomatoes). IMG_1754
Mix the liquids together and add to the pot. IMG_1757
My Method:  Cook and go clean . . . IMG_1760
Bring to a boil and then let simmer for at least 1 hour, stirring occasionally. The longer it cooks, the better it tastes.
 
Come and get it . . .IMG_1763
Here it is about 3 hours later.
It will be even better in a few days when it’s re-heated.
 
Ready to eat . . .IMG_1765
I love my chili with cheese and fresh onion.
Mmm mmm mmm . . .
 
WAIT!!!
IMG_1767 
Almost forgot the Fritos! Now we’re good.
 
 
“Cook and go Clean” Chili                      Printable Recipe
Ingredients:   
   2 lbs of ground beef
   1/2 white onion, diced
   1-1/2 cans of green chilies
   Chili beans (large can) 
   Whole tomatoes (large can)
   Kidney beans (regular can)
   Tomato sauce
   Ketchup
   Chili powder.

Directions:
1. In a large pot, brown the ground beef. Make sure you have sprinkled the ground beef with chili powder.
2. While the ground beef is browning, add chopped onion (to taste) and one can of green chilies. Continue browning and then drain grease.
3. Add tomatoes to the meat mixture. If using whole tomatoes, cup up with the wooden spoon.
4. Add kidney beans (drained and rinsed) and chili beans.
5. Add about a tablespoon of  ketchup.
6. Add 3/4 of a large can of tomato sauce.
7. Add additional chili powder (to taste).
8. Bring to a boil and then let simmer for at least 1 hour, stirring occasionally. It’s better the longer it cooks.

Notes:
You can substitute ground turkey for the ground beef (or do half and half). It tastes just as good but you may need to work harder to get it seasoned properly.

If you do not have enough liquid from the tomatoes, chili beans, and tomato sauce, add more liquid by mixing water with the juices from the cans. If you want a chunkier soup, you may not even bother with this.

Add salt and pepper as needed!

BlogSignaturesmallercopy-1

Sunday, September 19, 2010

Slaw Salad

This salad is another favorite from the “How Lovely Cooks the Meat” cookbook. In case you missed it, you can read about the family cookbook in my post about Spanish Rice.

Like Spanish Rice, Slaw Salad is another dish you will find at a Davis family reunion. That is, my Davis side. (Side note: For those new to my blog, my maiden name was Davis and I married someone with the same last name. While I’m from the Nebraska Davis clan, James is from the Texas clan). Anyway, I digress as usual . . .

I often referred to this salad as Sue’s Salad because it was my Aunt Sue who first brought the salad to a family gathering many many years ago. This is the easiest and quickest thing in the world to make. If you have a potluck to go to, I would highly recommend taking this. I personally like this salad on the crunchy side (ie, tossing everything together and then eating it soon after). My husband likes it when the noodles have had a chance to soak up the dressing and soften up. Either way Slaw Salad is the perfect “go to” salad.

The Ingredients . . .IMG_1637Green onions, two packages of ramen noodles (oriental flavor is the best), shredded cabbage (I use the bag mix), slivered almonds, sunflower kernels, vegetable oil, apple cider vinegar, and sugar.
You can certainly shred your own cabbage. I can pretty much guarantee that my aunt does. I am, however, lazy and like the bag mix. I only used one bag of cabbage (approx. 4 cups) for this salad, but I should have used a bit more. I would recommend 1-1/2 bags of pre-shredded cabbage or 6 cups of shredded cabbage.
 
Taking out some frustration . . .IMG_1639My favorite part . . . crushing the ramen noodles. It’s kind of like one of those stress balls. Just don’t pulverize the noodles.
 
Putting it all together . . .IMG_1643Combine the shredded cabbage, crushed noodles, sliced green onions (white and green parts), slivered almonds, and sunflower kernels in a big mixing bowl.
 
For this salad, I used a 2 ounce bag of almonds and added an equal amount of sunflower kernels. Pine nuts are also good for this salad.
 
Dressing it up . . .
MeasureIMG_1644 
MixIMG_1646
 PourIMG_1647Combine seasoning packets (from noodles) with  2/3 cup sugar,
1/2 cup apple cider vinegar, and 1/2 of vegetable oil. Pour over cabbage/noodle mixture. I used my Pampered Chef Measure, Mix, and Pour to combine everything.
 
 All mixed up . . .IMG_1648and ready to eat!

As I mentioned before, this is perfect for potlucks. I’ve also served this at Thanksgiving as a side salad. It’s something you can prepare in advance (ie, night before) for softer noodles. If you want to serve right away, let it sit for at least 20 minutes. The noodles will still be crunchy, but they will absorb some of the dressing. I hope you enjoy!

One more thing . . . I will continue to include the text recipe below the picture version, but I’ve also added the ability to print recipes without having to cut and paste somewhere else first. Just look for the “Printable Recipe” link.
 

Slaw Salad                      Printable Recipe
Ingredients:
   5 green onions, slice (white and green)
  1-1/2 bags of shredded cabbage (approx. 6 cups)
   2 packages of ramen noodles (oriental flavor)
   2 oz package of slivered almonds
   2 oz (approx.) of sunflower kernels 
   2/3 cup sugar
   1/2 cup apple cider vinegar
   1/2 cup vegetable oil

Directions:
1. Crush ramen noodles. Put seasoning packets aside.

2. Combine the shredded cabbage, crushed noodles, sliced green onions (white and green), slivered almonds, and sunflower kernels in a big mixing bowl.You can also add pine nuts or use in place of the almonds and/or sunflower kernels.

3. Combine seasoning packets with sugar, apple cider vinegar, and vegetable oil. Pour and stir into cabbage/noodle mixture.

Note:
For softer noodles, prepare in advance (ie, night before). If you plan to serve right away, I recommend letting it sit for at least 20 to 30 minutes. The noodles will absorb some of the dressing but will still be crunchy.

BlogSignaturesmallercopy-1

Thursday, September 9, 2010

Grandma’s Spanish Rice (and Bri’s Stuffed Peppers)

I think every family has their “family favorite” recipes. My family (on all sides) happens to have quite a few. In fact, several years ago my dad’s sister Letty put together a cookbook full of recipes from family and close friends. The book’s title, “How Lovely Cooks the Meat,” references a song that he and his siblings grew up listening too. For a nice little laugh, listen to that song HERE (wow, YouTube has everything).

IMG_1663 Included in the cookbook is one of the family’s most coveted recipes: Grandma Davis’ Spanish Rice. In fact,  Aunt Letty included the following note next to the recipe: “Several people requested that mom send in this recipe. She says she doesn’t use a recipe but this is approximate proportions. Mom is known for her Spanish Rice at picnics and get-togethers.” Awww…yes, this dish has graced the table of practically every family get-together I’ve ever been too. From what I understand, it’s a dish my Great-Grandmother Gladys Bailey threw together, probably during “hard times” (I’ll have to go back to Grandma for the full story). It consists of very simple ingredients, but it has all of the “comfort” you could ever want.

To any family members reading this blog, leave a comment and tell me what your “family favorite” is. I’ll make it and blog about it in the future. I just made Aunt Sue’s Slaw Salad last weekend, and I’m thinking it’s time to try Aunt Linda’s Calico Beans. Hmmmm…idea. . .maybe I’ll pick some random recipes from the book, make them, and blog about them too. There are only 600 recipes to choose from. Ok, before becoming overzealous let me share what’s on the table now . . . my version of Grandma Davis’ Spanish Rice.


How Lovely Cooks the Meat . . .IMG_1258Brown 1-1/2 to 2 lbs of ground beef, 1 large white onion (chopped), and 3/4 cup of green pepper (chopped). The green pepper is optional.

Grandma’s recipe says the secret is to “brown the hamburger really good and then add the green pepper and onion.” I actually sautéed the green pepper and onion with the meat. I’m not sure it made a real difference. I did make sure the meat was good and brown. Don’t forget to drain the grease. 

An added bonus . . . IMG_1260
Spanish Rice is perfectly fine served by itself, but I’ve always thought it would be really tasty stuffed inside of a green pepper. Here are my green peppers . . . ready and waiting!

Obviously, if you’ve omitted green pepper from the meat mixture, you’re going to want to skip right on over that “added bonus.”

Adding some color . . . IMG_1261
To the meat/onion/green pepper mixture, add 1 quart of tomatoes (or more). I used about 1-1/2 quarts.

I happen to be very lucky that I have parents who have a garden and a mom who loves to can. It’s a treat (literally) at Christmas time to receive a gift of home-canned tomatoes (and green beans, and cinnamon pickles, and salsa and . . .) Where was I? Oh yes. . .home-canned tomatoes. That is what you’re seeing in these pictures. Yum!

And now some texture . . .IMG_1262Add 1 cup of white rice (not Minute Rice).I suppose you could use brown rice, but it may alter the flavor a little bit.

IMG_1263 With everything added to the skillet, I let it sit for a bit. Grandma’s recipe doesn’t really say to do this, but I do it anyway.

Ready to bake . . . IMG_1265
Pour meat/rice mixture into a large baking dish. Place in a 350 degree oven for 1 to 1-1/2 hours. Cooking time may vary.

Important Note: Spanish Rice tends to bake on the “dry” side. I add a little water before putting into the oven. After 1/2 hour, you should add some water (or tomato juice) to keep it moist. You don’t want it to be runny, but you need enough liquid so that the rice is completely cooked. You will also want to stir the rice throughout it’s baking cycle.

About them peppers . . .IMG_1264
Here’s what they looked like before going into the oven. I had spooned some of the mixture directly from the skillet into the peppers.

IMG_1266
The stuffed peppers right out of the oven.

Now, here’s what I learned about stuffing peppers . . .it’s a bit of a challenge to add additional liquid to the peppers without it seeping out the bottom. Even more challenging is trying to stir the rice so that it cooks evenly. Thus, some of the rice in my peppers (mostly at the top) was a bit on the crunchy side. So, with my next attempt I will place the empty peppers in the oven about 15 minutes after the rice mixture has had time to bake. About 30 minutes in, I will add some of the “cooked” rice mixture to the peppers. Regardless, they stuffed peppers were delicious!

IMG_1267
Spanish Rice right out of the oven

Ready to eat . . .IMG_1269

The woman behind the recipe . . . IMG_1322Here I am with my grandma, Marian Davis. Bless her heart!!!

Spanish Rice
Ingredients:
   1-1/2 to 2 lbs of ground beef
   1 large chopped white onion
   1 to 1-1/2 quarts of tomatoes
   1 cup of white rice (not Minute Rice)
   water or tomato juice
   Optional: 3/4 cup of chopped green pepper
Ingredients for Stuffed Peppers:
   Whole green peppers, seeds removed

Directions: 
   1. Brown ground beef, chopped onion, and chopped green pepper. 
   2. Stir in tomatoes and rice. Let sit for a few minutes.
   3. Pour meat/rice mixture into a large baking dish and add some water (about 1/2 cup) or tomato juice.
    4. Place in a 350 degree oven for 1 to 1-1/2 hours. 
    5. After 1/2 hour, add water (or tomato juice) to keep the rice moist. Stir the rice throughout the baking cycle. Cooking time may vary.

**For Stuffed Peppers: Place the empty peppers in the oven about 15 minutes after the rice mixture has had time to bake. About 30 minutes in, add some of the “cooked” rice mixture to the peppers. Continue baking.**  (Disclaimer: I haven’t tried this yet as I mentioned above)

For us, this is a meal in itself. We usually serve with garlic bread and maybe a salad. I hope our family favorite becomes your favorite too.

Side note: I may or may not have listened to “How Lovely Cooks the Meat” about five times while typing this post. :-)

BlogSignaturesmallercopy-1